Copying
This chapter gives you step-by-step instructions for copying documents.
When you press from the
display screen, the screen
appears which has several tabs and lots of copying options. All
the options are grouped by features so that you can configure your
selections easily.If a different screen is displayed, press ( ) to
go to the home display screen.

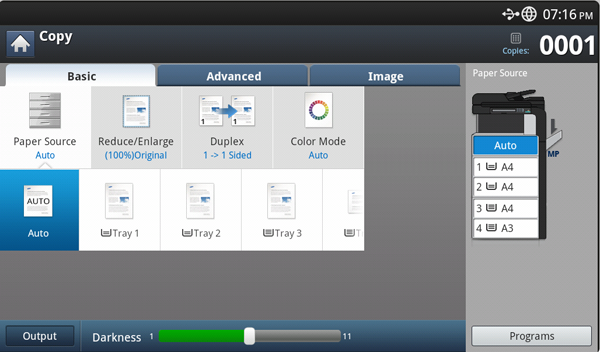
tab
-
:†Enters the number of copies.
-
:†Selects the paper source tray (see Selecting the Paper Source tray).
-
:†Reduces or enlarges the size of a copied image (see Reducing or enlarging copies).
-
:†Sets the machine to print copies on both sides of the paper (see Copying multiple sides).
-
:†Selects a color mode for making copies (see Selecting the color mode (CLX-9201 9301 Series only)).
-
:†Sets the machineís various output options (see Deciding the form of copy output).
-
Darkness:†Adjusts the brightness level to make a copy for easier reading, when the original contains faint markings and dark images (see Changing the darkness).
-
:†Allows you to save the current settings for future use (see Using a programís setting).
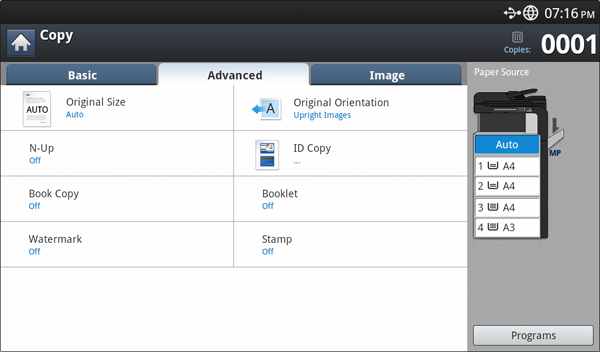
tab
-
:†Selects the actual paper size of the originals (see Selecting the size of originals).
-
:†Selects the orientation of the originals (see Selecting the orientation of originals).
-
:†Prints 2-sided originals on one sheet of paper. This feature is helpful for copying a small-sized item, such as a business card (see ID card copying).
-
:†Prints 2 or more original images, reduced to fit onto one sheet of paper (see N-up copying).
-
:†Allows you to create booklets (see Booklet copying).
-
:†Allows you to copy the left or/and right pages of book on separate output paper (see Book copying).
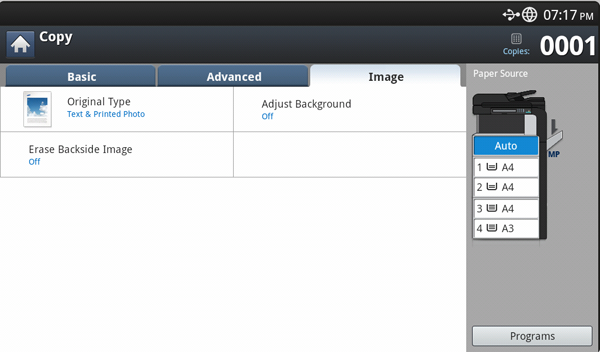
tab
-
:†Improves the copy quality by selecting the originalís type for the current copy job (see Selecting the type of originals).
-
:†Prints an image with a lighter background.(see Adjusting background).
-
:†Prevents copying the originalís image shown through on the backside (see Erasing backside Images).
This is the normal and usual procedure for copying your originals.
-
Press from the display screen.

-
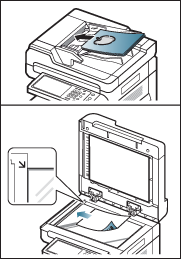
Place the originals face up in the DADF or place a single original face down on the scanner glass and close the DADF (see Loading originals).
-
Adjust the settings for each copy such as , , and more in the tab (see Changing the settings for each copy).
-
Set the copy features in the or tabs, if necessary (see Using special copy features).
-
Enter the number of copies using the numeric keypad on the control panel, if necessary.
-
Press
 () from the control
panel to begin copying.
![[Note]](../common/note.png)
|
|
|
Copying originals of different sizes
This feature allows you to copy originals of different sizes at once.
![[Note]](../common/note.png)
|
|
|
-
Press from the display screen.
-
Place the different sized originals face up in the DADF. When you place them in the DADF, align and gently push them to the rear side of the DADF width guide.
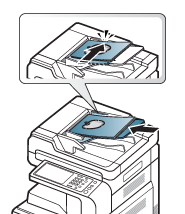
-
Press the tab > > from the display screen.
![[Note]](../common/note.png)
The option is activated when the originals are placed in the DADF.
-
Adjust the settings for each copy such as , and more in the tab (see Changing the settings for each copy).
-
Set the copy features in the or tab, if necessary (see Using special copy features).
-
Enter the number of copies using the numeric keypad on the control panel, if necessary.
-
Press
 () from the control
panel to begin copying.
Changing the settings for each copy
On the tab of the screen, you can select copy features before starting to copy.
![[Note]](../common/note.png)
|
|
|
The tab setting is only for the current copy job, which means the selected settings do not apply to the next copy job. After finishing the current copy job, the machine automatically restores the default settings, or when you press the button on the control panel. |
sets the tray containing the paper to be used for printing. The machine prints the scanned image on the paper in the selected tray. You can see the icons that show paper sizes and the remaining amount of paper in each tray.
Press the tab > , then press the appropriate paper tray.
-
:†Automatically detects the paper size with the paper tray.
-
Other preset values:†Check the paper size in each tray and press the tray containing the paper size you want.
Using the feature allows you to print an original image reducing or enlarging it to fit the paper. You can press the icons that show how to reduce and enlarge copies.
Press the tab > , then press the appropriate option to reduce or enlarge an image on the paper.
![[Note]](../common/note.png)
|
|
|
When you use this option, in the tab are inactive. |
-
:†Prints texts or images the same size as originals.
-
:†Reduces or enlarges the original based on the size of the output paper.
-
Other preset values:†Check the image and value on each icon and press the one you want to use.
You can select an option by pressing a button in the and list. You can also reduce or enlarge by 1% between 25 ~ 400% to print a copy using the left/right arrows.
-
Custom:†You can set and save the custom zoom values (between 25 ~ 400%) using Custom. You can select custom values whenever you need it.
The duplex feature allows you to copy one-sided or two-sided originals on both sides of the paper or divide two-sided originals into multiple one-sided copies. Check the available paper using the feature. You can only use this feature with Letter SEF, Letter LEF, Ledger, Legal, Executive SEF, Statement SEF, A3, A4 SEF, A4 LEF, A5 SEF, B4, JIS B5 SEF, ISO B5 SEF, 8K, 16K, and Oficio.
![[Note]](../common/note.png)
|
|
|
Press the tab > , then press the appropriate duplex option.
![[Note]](../common/note.png)
|
|
|
If an original is placed on the scanner glass and you press , or , the message appears after the first page is copied. Load another original and press . When you finish, press on this window. |
-
:†Scans one side of an original and prints it on one side of the paper. This function produces exactly the same printout from the originals.
-
:†Scans one side of originals and prints them on both sides of the paper.
-
:†Scans both sides of the originals and prints each one on a separate page.
You can select the original binding type: either or .
-
:†Scans both sides of the original and prints on both sides of the paper. This function produces exactly the same printout from the originals.
You can select the original and output binding type: either or .
The machine provides many powerful effects on images without having expert editing skills.
Press the tab > , then select the color mode you want.

If you press the button, you can see more options.
-
:†Select this setting to automatically detect whether the scanned document is in color or black and white, and then select an appropriate color setting.
-
:†Select this setting to print the same as the original image color.
Refer to the sample images below. Depending on the circumstances and quality of originals, the printoutís quality could be different from the sample imageís.
Original
Copy
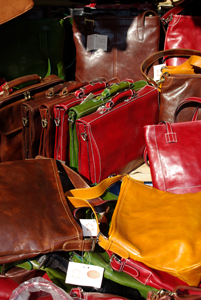

-
:†Select this setting to print the copy in black and white, regardless whether the scanned document is in color or in black and white.
Refer to the sample images below. Depending on the circumstances and quality of originals, the printoutís quality could be different from the sample imageís.
Original
Copy
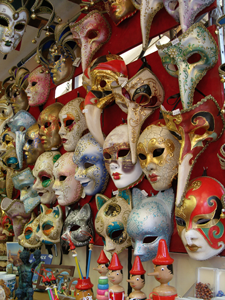
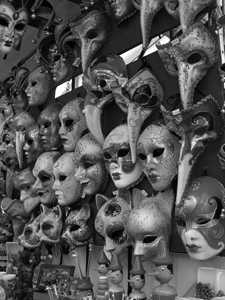
![[Note]](../common/note.png)
|
|
|
Press the tab > , then select the copy output options you want.
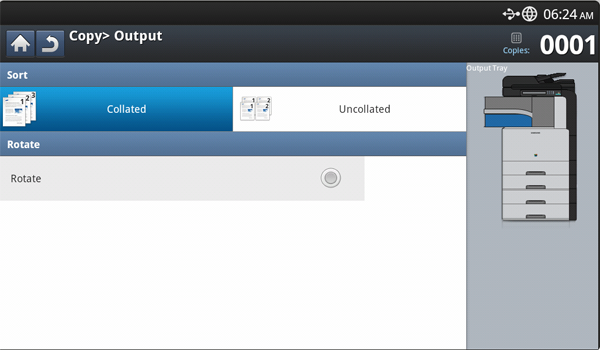
-
:†Printouts in sets to match the sequence of originals.

-
:†Printouts sorted into stacks of individual pages.

-
:†Printouts are stacked criss-crossed in sets.
![[Note]](../common/note.png)
-
This feature is available only when the standard or booklet finisher is not installed.
-
This feature is available only with Letter- and A4-sized print media.
-
Before using this feature, you have to load the paper in the trays with SEF (Short edge feed) and LEF (Long edge feed). For example, direction of paper feeding in tray 1 is SEF, and direction of paper feeding in tray 2 is LEF.
-
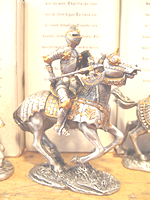
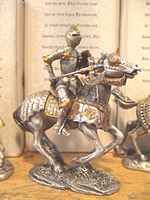
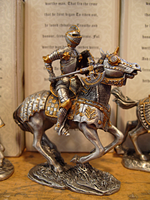
Press the tab. You can adjust the degree of darkness using the left/right arrows. This feature allows dark images to be printed into lighter images, or light images into darker images.

Refer to the sample images below. Depending on the circumstances and quality of originals, the printoutís quality could be different from the sample imageís.
|
Light |
Slightly light |
Original |
Slightly dark |
Dark |
|
|
|
|
|
Using special copy features
On the or tab of the screen, you can select specific copy features.
Copies can be produced after specifying the document scanning size if the document size cannot be detected automatically or if you wish to specify a certain document size.

-
Press from the display screen.
-
Place the originals face up in the DADF or place a single original face down on the scanner glass and close the DADF (see Loading originals).
-
Adjust the settings for each copy such as , and more in the tab (see Changing the settings for each copy).
-
Press tab > from the display screen.
-
Select the original size.
![[Note]](../common/note.png)
You can change the paper list on the display screen pressing or . The paper list is divided into the available A/B size type and letter size type paper in this machine.
-
Custom:†If there is no required paper size or you need to use custom sized paper, press the cardinal point arrows to set the original size. You can also set and save the custom size using . You can then select the custom size whenever you need it.
![[Note]](../common/note.png)
The custom size available is different depending on where the originals are placed.
In the DADF
On the scanner glass
Minimum size
128 x 128†mm
(5 x 5 inches)
25 x 25†mm
(1.0 x 1.0 inches)
Maximum size
297 x 432†mm
(11.7 x 17.0 inches)
297 x 432†mm
(11.7 x 17.0 inches)
-
:†Automatically detects the size of originals, but this option is supported only when originals are A3, A4 LEF, A4 SEF, B4, B5 LEF, B5 SEF, A5 LEF, A5 SEF, Ledger, Legal, Letter LEF, Letter SEF, Statement LEF and Statement SEF-sized.
If you use non-standard-sized paper, image loss could occur. In this case, you need to select the appropriate paper size before you print.
-
:†Allows the use of both of Letter and Legal-sized papers together, and the machine uses the proper-sized paper from several trays. For example, if the originals total 3 pages, the 1st page is letter-sized paper, the 2nd page is legal-sized paper, and the 3rd page is letter-sized paper, then the machine prints the output first letter, legal, and letter in order from several trays.
![[Note]](../common/note.png)
is activated when the originals are placed in the DADF.
-
Other preset values:†You can select the size of originals directly by pressing the buttons.
-
-
Press from the display screen.
-
Press on the control panel to begin copying.
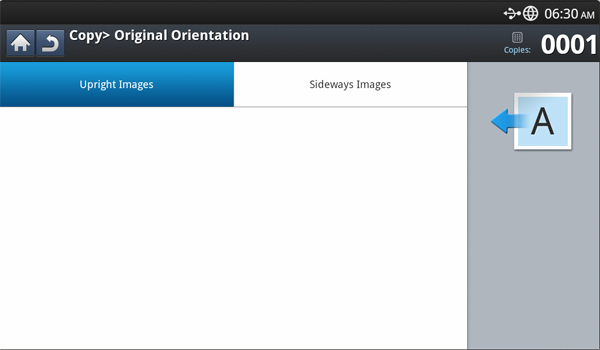
When copying double-sided documents or making double-sided copies or combined copies, specify the document orientation; otherwise, the copies may not be printed in the correct page order or correct front and back page arrangement.
-
Press from the display screen.
-
Place the originals face up in the DADF or place a single original face down on the scanner glass and close the DADF (see Loading originals).
-
Press tab > from the display screen.
-
Select the orientation of the original document.
-
:†Select this setting for an original document loaded with the top toward the back of the machine.
Using the DADF
Using the scanner glass
Icon





-
:†Select this setting for an original document loaded into the DADF with the top of the original document toward the left side of the machine or an original document placed on the scanner glass with the top of the original document toward the right side of the machine.
Using the DADF
Using the scanner glass
Icon





-
-
Press on the control panel to begin copying.
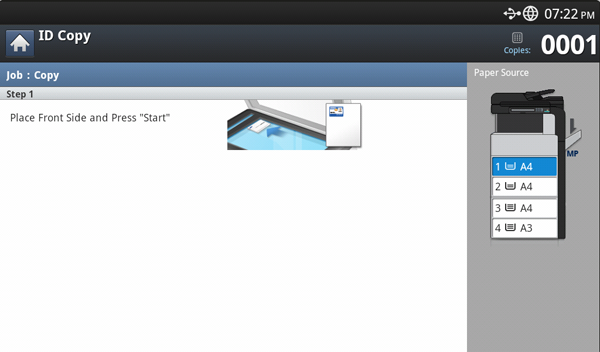
The machine prints one side of the original on the upper half of the paper and the other side on the lower half without reducing the size of the original.
This feature is helpful for copying a small-sized item, such as a business card.
![[Note]](../common/note.png)
|
|
|
-
Press from the display screen.
-
Press the tab > from the display screen.
-
Select a tray in .
-
Follow the steps on the display screen.
-
Place the front side of an original facing down on the scanner glass as shown below, and close the DADF.
![[Note]](../common/note.png)
When you place an original on the scanner glass, leave a little space between the edge of the scanner glass and the original. Otherwise, part of original may not be printed.
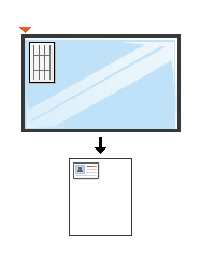
-
Press on the control panel. Then the machine starts scanning.
-
Turn the original over and place it on the scanner glass as shown below, and then close the DADF.
![[Note]](../common/note.png)
When you place an original on the scanner glass, leave a little space between the edge of the scanner glass and the original. Otherwise, part of original may not be printed.
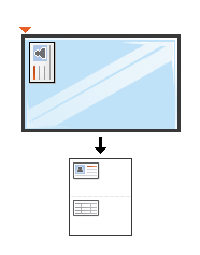
-
Press on the control panel to begin copying.
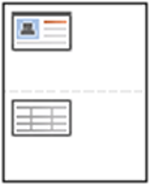
![[Note]](../common/note.png)
|
|
|
The machine reduces the size of the original images and prints 2 - 9 pages onto one sheet of paper.
![[Note]](../common/note.png)
|
|
|
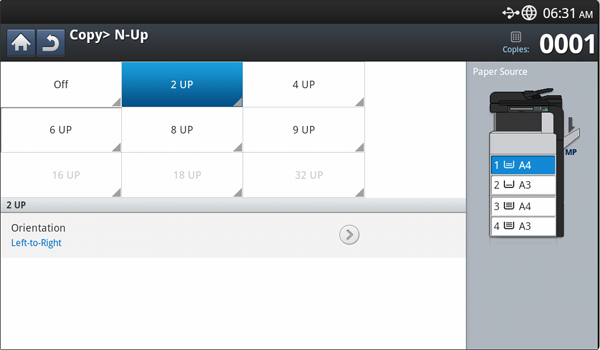
-
Press from the display screen.
-
Place the originals face up in the DADF or place a single original face down on the scanner glass and close the DADF (see Loading originals).
-
Press tab > from the display screen.
-
Press an option according to how many images to copy onto one page.
-
:†Copies an original onto one sheet of paper.
-
- :†Copies corresponding numbers of separate originals to one page.
![[Note]](../common/note.png)
Depending on original document size, output paper size, and the reduced rate of image, some options may be inactivated.
-
-
Select a tray in .
-
Press the appropriate page order.
-
Depending on the options you select, the result will vary. Refer to the below table before using the option.
Original orientation
(DADF/Scanner glass)
(display screen)
Direction of paper feeding in the tray
Available orientation
Result
In the DADF

On the scanner glass


or


In the DADF

On the scanner glass


LEF or SEF
In the DADF

On the scanner glass


LEF or SEF
or


In the DADF

On the scanner glass


LEF or SEF
[a] LEF meaning is Long Edge Feed.
[b] SEF meaning is Short Edge Feed.
-
All other page order options of N-up are the same except for the . You can press , , , and .
-
-
Press on the control panel to begin copying.
If an original is placed on the scanner glass, the machine shows the window asking if you want to place another page. Load another original and press . When you finish, press on this window.


The machine automatically prints on one or both sides of the paper, which are then folded to produce a booklet with all the pages in the correct sequence.
The machine will also reduce and correctly adjust the position of each image to fit on the selected paper.
![[Note]](../common/note.png)
|
|
|
-
Press from the display screen.
-
Place the originals face up in the DADF or place a single original face down on the scanner glass and close the DADF (see Loading originals).
-
Adjust the settings for each copy such as and more in the tab (see Changing the settings for each copy).
-
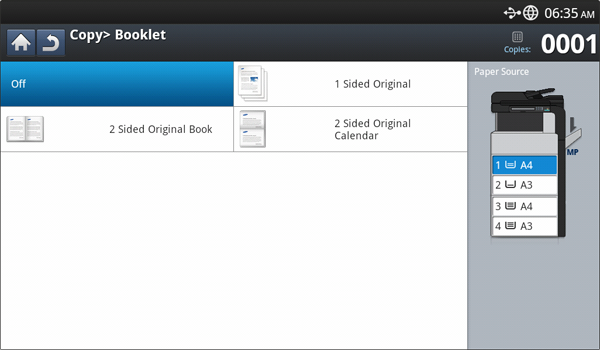
Press the tab > from the display screen.
-
Select a tray in .
-
Press the appropriate option.
-
:†Disables this feature.
-
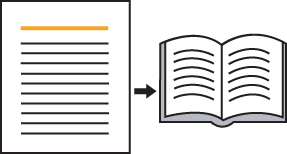
: Copies from one side of the original to one page of a booklet.
-
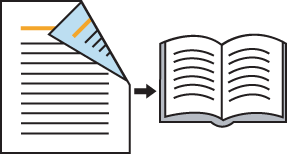
: Copies each side of an original to one page of a booklet.
-
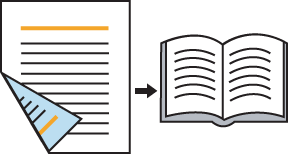
: Copies each side of an original to one page of a booklet. The second side of each original is rotated 180 degrees so the text will be upright in the booklet.
-
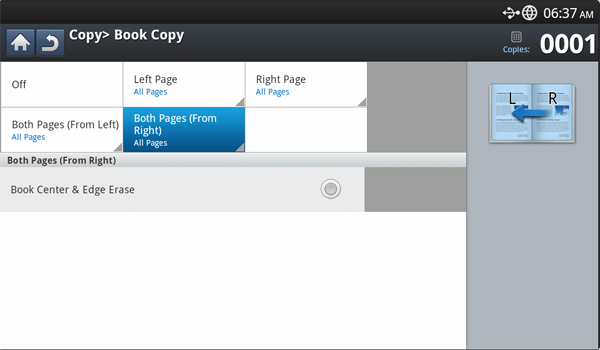
Use this feature to copy a book. If the book is too thick, lift the DADF until its hinges are engaged by the stopper and then close the DADF. If the book or magazine is thicker than 30 mm (1.18 inches), start copying with the DADF open.
![[Note]](../common/note.png)
|
|
|
-
Press from the display screen.
-
Place a book page face down on the scanner glass (see Loading originals).
![[Note]](../common/note.png)
-
When you place a book on the scanner glass, leave a little space (about 10 mm) between the top or bottom edge of the scanner glass and the book.
-
Some books may not be available in this feature such as a hard-cover book, poorly bound book, etc.
-
-
Adjust the settings for each copy such as , and more in the tab (see Changing the settings for each copy).
-
Press the tab > from the display screen.
-
Press the appropriate option.
-
:†Disables this feature.
-
:†Prints only the left page of the book.

-
:†Prints only the right page of the book.

-
:† Prints both facing pages from the left page.

-
:† Prints both facing pages from the right page.

-
:†Erases shadows of a binding or book edge from the center and side edges of copies.
-
-
Press on the control panel to begin copying.
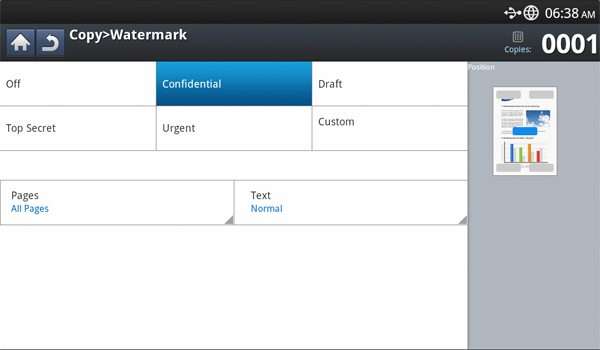
The watermark option allows you to print text over an existing document. For example, you use it when you want to have large gray letters reading ďDRAFTĒ or ďCONFIDENTIALĒ printed diagonally across the first page or all pages of a document.
![[Note]](../common/note.png)
|
|
|
This feature may not be available depending on models or option kits installed. |

There are several predefined watermarks that come with the machine. You can also enter a personalized watermark.
![[Note]](../common/note.png)
|
|
|
When you use this option, in the tab is disabled. |
-
Press from the display screen.
-
Place the originals face up in the DADF or place a single original face down on the scanner glass and close the DADF (see Loading originals).
-
Adjust the settings for each copy such as , , and more in the tab (see Changing the settings for each copy).
-
Press the tab > from the display screen.
-
Press the appropriate option.
-
:†Disables this feature.
-
Other preset values:†Allows you to easily select values commonly used.
-
:†Allows you to enter a text message using the pop-up keyboard.
-
-
Set the settings.
-
:†Select to print the option on all pages or only the first page.
-
:†Select the text message color and size.
-
:†Select the printed position of the text message.
-
-
Press on the control panel to begin copying.
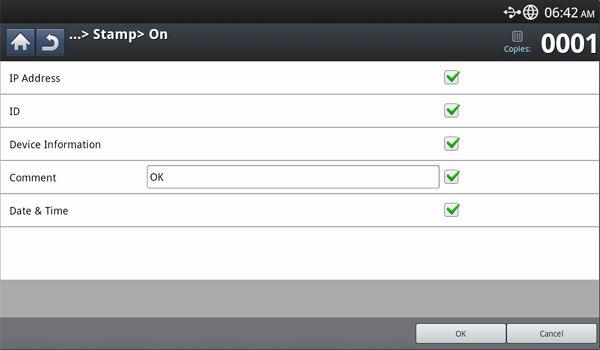
Prints the date and time, IP address, device information, and the entered comment on printouts.
-
Press from the display screen.
-
Place the originals face up in the DADF or place a single original face down on the scanner glass and close the DADF (see Loading originals).
-
Adjust the settings for each copy such as , and more in the tab (see Changing the settings for each copy).
-
Press the tab > from the display screen.
-
Check the button on the right.
-
Press the checkbox on the right.
-
:†This option allows you to print a IP Address on the printouts.
-
:†This option allows you to print a user ID on the printouts.
-
:†This option allows you to print a device information on the printouts.
-
:†This option allows you to print your comment on the printouts.
-
Time & Date:†This option allows you to print time and date stamps on the printouts.
-
-
Press from the display screen.
-
Press on the control panel to begin copying.
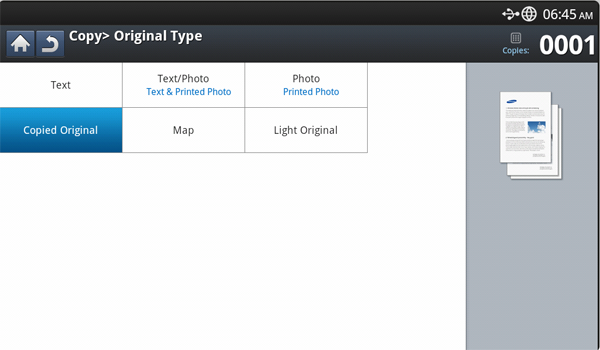
The original type setting is used to improve copy quality by selecting document types for current copy jobs.
-
Press from the display screen.
-
Place the originals face up in the DADF or place a single original face down on the scanner glass and close the DADF (see Loading originals).
-
Adjust the settings for each copy such as , , and more in the tab (see Changing the settings for each copy).
-
Press the tab > from the display screen.
-
Press the appropriate option.
-
:†Use for originals containing mostly text.
-
:†Use for originals containing text mixed with photographs.
-
:†Use for photographs.
-
:†Use for copied documents.
-
:†Use for maps.
-
:†Use for light documents.
-
-
Press on the control panel to begin copying.
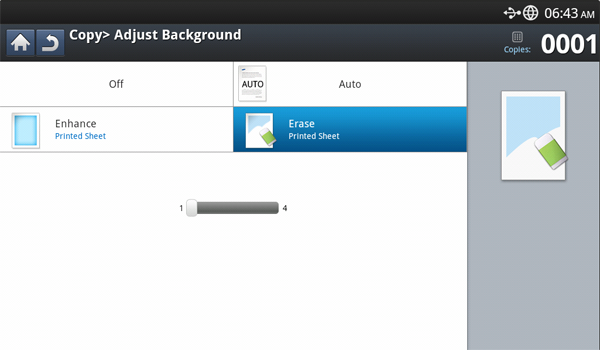
This feature is helpful when copying originals containing color in the background, such as in newspapers or catalogs.
-
Press from the display screen.
-
Place the originals face up in the DADF or place a single original face down on the scanner glass and close the DADF (see Loading originals).
-
Adjust the settings for each copy such as , , and more in the tab (see Changing the settings for each copy).
-
Press the tab > .
-
Press the appropriate option.
-
:†Disables this feature.
-
:†Optimizes the background.
-
:†The higher the number is, the more vivid the background.
-
:†The higher the number is, the lighter the background.
-
-
Press on the control panel to begin copying.
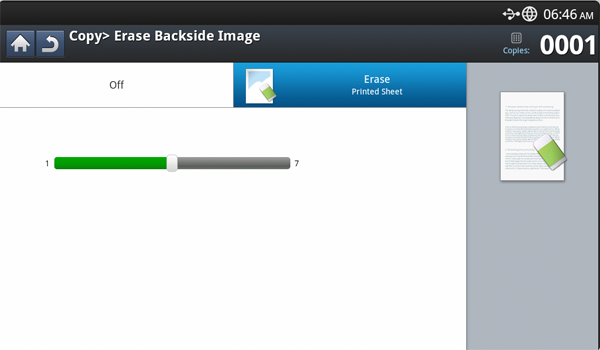
When the original is thin and backside images show through, you can use this feature to remove the backside images.
-
Press from the display screen.
-
Place the originals face up in the DADF or place a single original face down on the scanner glass and close the DADF (see Loading originals).
-
Adjust the settings for each copy such as , , and more in the tab (see Changing the settings for each copy).
-
Press the tab > .
-
Press the appropriate option.
-
:†Disables this feature.
-
:†The higher the number is, the lighter the backside image is.
-
-
Press on the control panel to begin copying.
This option allows you to save the current settings for future use. You can also use the previous settings from the last job.
Saving
-
Press from the display screen.
-
Adjust the settings for each copy such as , and more in the tab (see Changing the settings for each copy).
-
Set the copy features in the or tabs, if necessary (see Using special copy features).
-
Press the tab or .
-
Enter the number of copies using the numeric keypad on the control panel, if necessary.
-
Press .
-
Press .
-
Press input area. The pop-up keyboard appears.
Enter the program name you want. Press .
![[Note]](../common/note.png)
You can see the values of set by scrolling up or down and check the values using the up/down arrows.
-
Press . When the confirmation window appears, the settings you set are saved. Press to check the list or .
Loading
-
Press from the display screen.
-
Place the originals face up in the DADF or place a single original face down on the scanner glass and close the DADF (see Loading originals).
-
Press > .
-
Press a program name you want to use on the list.
-
Press .
The machine is now set to copy according to the setting you selected.
-
Press from the control panel to begin copying.
The menu allows you to quickly set copy options without having to move to a lower level menu or another tab. But, this menu does not provide all copy options. If you need to use other copy options, use the copy options in the menu (see Changing the settings for each copy or Using special copy features).
-
Press from the display screen.

-
Place the originals face up in the DADF or place a single original face down on the scanner glass and close the DADF (see Loading originals).

-
Adjust the settings for each copy such as , , , , etc.
![[Note]](../common/note.png)
You can set the default options from > > from the display screen. Set the most frequently used settings.
-
Enter the number of copies using the numeric keypad on the control panel, if necessary.
-
Press
 () from the control
panel to begin copying.
